4. Are you sure you want to do this? Please try again.
5. The theme is missing the style.css stylesheet
6. How to update Crexis theme and plugins
7. How to Improve Page Loading Times
8. Current Crexis theme and plugins version
9. Theme Customization
10. How to install the Child Theme?
11. How do I update my theme and plugins?
12. Essential Grid & Ultimate VC Addons Plugins
13. WPBakery Visual Composer, Revolution Slider, Layer Slider and other plugins ask for activation key
14. How to add custom CSS code?
15. Google Maps not working
16. How do I access the old Support Forums?
17. Crexis Theme Hooks
18. Getting Map Coordinates (lat,lng)
19. WordPress 5.5.* Update & WPBakery issues
1. How to install Crexis WordPress theme?
There are two ways to install the theme:
The default way: using just the WordPress dashboard.
The FTP way: using an FTP client like FileZilla.
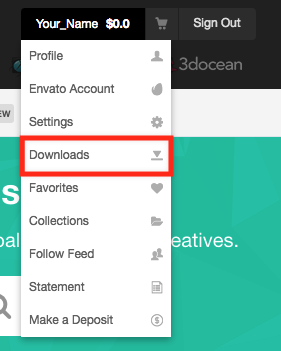
Each method is well described below. Despite which you choose, you need to download the theme files if you haven't done so already. To do that, log in to your ThemeForest account and navigate to the "Downloads" tab:
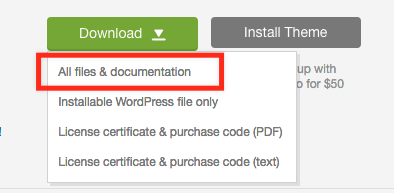
A list of your purchased items will appear. Find the "Crexis" theme and click on the "Downloads" button on the right. A dropdown list will appear:
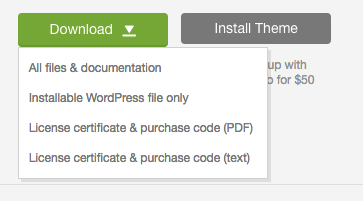
You may either choose to download:
"All files & documentation" - it's a big archive file that contains all files: theme archive, documentation, slider demos and so on. If you decide to download it, you will need to unzip it first and the crexis.zip file inside is the one you are going to use in further steps.
"Installable WordPress file only" - as the name says it's just the installable zip archive and it's ready to be uploaded to your WordPress.
Now you may follow the next steps of the tutorial, depending on which way you choose.
The default way
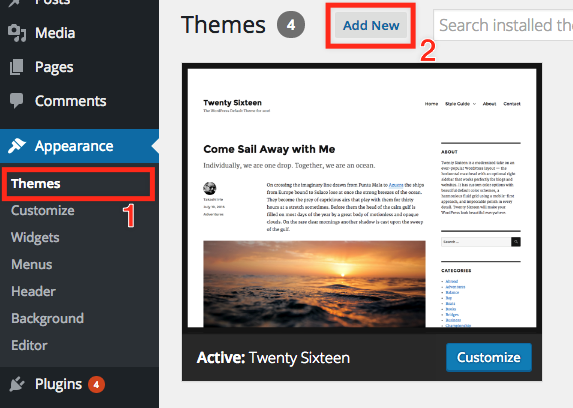
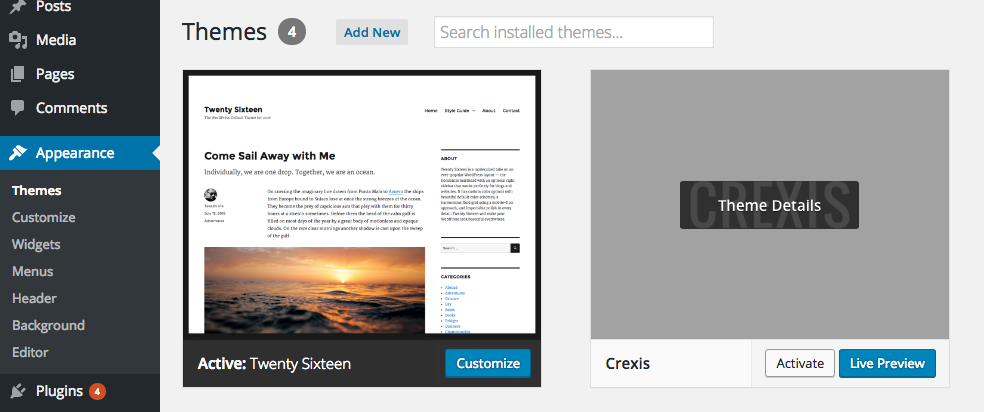
First of all, log in to your WordPress dashboard, navigate to the Appearance / Themes section and click on the "Add New" button:
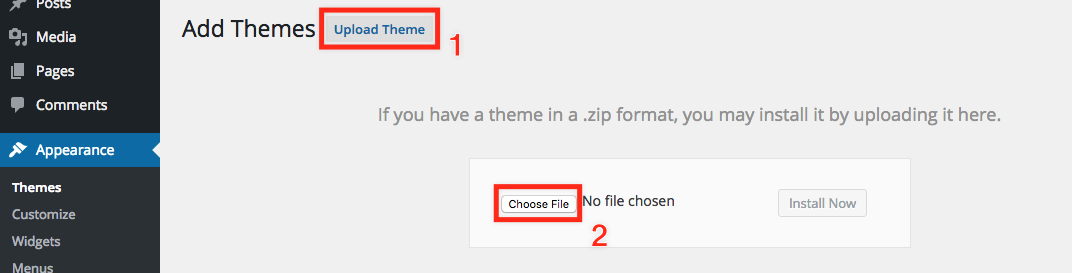
On a new screen, please press the "Upload Theme" (1) button and the upload form will show up:
After you click the "Choose File" (2) file, navigate to the theme files you downloaded from ThemeForest and choose the proper zip file to be uploaded:
If you downloaded the "Installable WordPress file only" then that's the zip file to be downloaded.
If you downloaded the "All files & documentation" archive file that is ~100mb in size then you need to unzip it first. The crexis.zip file inside is the one to be installed.
After you choose the file, click on the "Install Now" button. If you encounter any troubles during this part, please check this article article.
If everything went well, you should be greeted with a message that the theme was successfully installed. Please click the "Activate theme" button. The theme is now activated. You will now see a notification about required plugins and that is covered at the end of this article.
The FTP way
If you prefer to install the theme using FTP then you are free to do so. You will need an FTP client like FileZilla. If you are not familiar with it, please check this article.
After you are connected to your server/hosting, navigate to your /wp-content/themes/ folder. That is the location where you need to upload the theme folder. The theme folder is a folder you get after unzipping the theme archive file (crexis.zip).
After you the theme folder is uploaded, log in to your WordPress dashboard, navigate to Appearance / Themes and you will see the Crexis theme listed there. Just activate it:
Installing required plugins
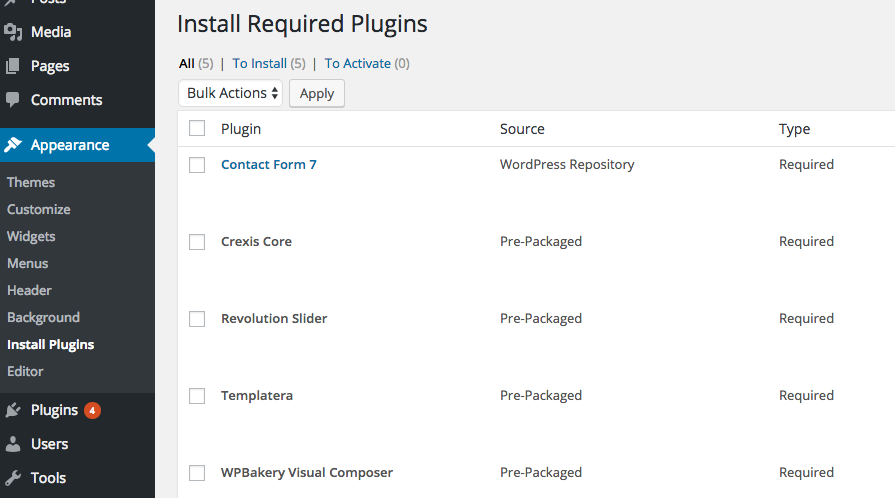
After you successfully activate the theme, a notice about required plugins will be displayed:
Simply click on the "Begin installing plugins" button and a new page will be shown:
Please check all plugins, click on the "Bulk Actions" select menu, choose "Install" and hit "Apply". All plugins will be now installed. After they are, you will need to repeat the process but this time select the "Activate" option from the "Bulk Actions" select menu and hit "Apply". All plugins will be activated and the theme is now ready to use.
2. How to import the demo content?
Installing the demo content in Crexis theme is truly easy. Just navigate to the Theme Options panel and click on the "Demo Import" tab:
You will see a list of all available theme demos. It's very important to import the Base Demo Content first. It contains all example portfolio, testimonials posts and photos that are required by all other demos. That's why it's the longest one to get imported: usually it takes ~90 seconds and depends on your server connection speed. After you import the Base Demo Content you can go ahead and import any other demo content.
If you encounter any issues regarding the demo import process, please check this article.
3. Can't import the demo content.
If you can't import the demo content (the loading process never ends and the icon keeps spinning) then it's probably your server configuration that has low upload limits.
The easiest way to fix this is to simply increase those limits and below are the recommended option values:
memory_limit 128M
post_max_size 64M
upload_max_filesize 64M
max_execution_time 120
If you are not familiar with editing those values in your php.ini file then please contact your hosting/server provider. They should increase those values without in an instant without a problem.
wp-config.php Option:
You can also try to include the following value in your wp-config.php file:
define( 'WP_MEMORY_LIMIT', '128M' );
Not all hostings allow this or are suitable for this (particularly if on a shared hosting). Ask your hosting for more info.
4. Are you sure you want to do this? Please try again.
If you get the Are You Sure You Want To Do This? message after uploading the theme's zip file via Appearance / Themes menu in your WordPress, it means that your server has low upload limits.
You may go around this problem in two ways:
Install the theme using an FTP client like FileZilla. The process is described in the Installing Theme article.
Increase the upload limits on your server, described below.
Below are the recommended values for specific options in your server configuration:
memory_limit 128M
post_max_size 64M
upload_max_filesize 64M
max_execution_time 60
If you are not familiar how to change those values in your php.ini file then please contact your host/server provider about it. They should change them in an instant.
5. The theme is missing the style.css stylesheet
If you get the The Package could not be installed. The theme is missing the style.css stylesheet error message then you are probably uploading the whole theme package zip file including the documentation, plugins and so on.
All you need to do is to upload the correct, small zip file. You can get it both ways:
If you downloaded "All files & documentation" zip file from ThemeForest then you need to unzip that archive file first. Inside, you will find a proper, smaller zip file according to theme's name, i.e. crexis.zip, waxom.zip or north.zip. That is the file you need to upload.
You may always download just the "Installable WordPress file" directly from ThemeForest. That archive is already ready to be uploaded to ThemeForest:
6. How to update Crexis theme and plugins
Current Theme version:
Crexis Theme: 2.7.5
Crexis Core plugin: 2.7.5
Current required plugins version:
Visual Composer: 5.6
Templatera: 1.1.12
Revolution Slider: 5.4.8.2
HOW TO UPDATE THE THEME:
There are two main ways to update the theme:
Automatic updates - for more information please follow this article.
Manual update - safer and faster way. You can find more information below.
You can update the theme manually two ways:
WordPress Dashboard Way:
In this method all you need to do is delete the theme and install it again with new files. None of your settings or changes will be lost in this process.
Navigate to Appearance / Themes tab and activate another theme, i.e. default WordPress theme. After you do so, click on the Crexis theme and click the "Delete" button located in the bottom right section of the popup window. The theme will be deleted. Now simply install the newest theme files downloaded from ThemeForest.
FTP Way:
This is a bit more advanced method but it's still very easy. You will need an FTP client like FileZilla to connect to your server/host. If you are not familiar with it, please check this article.
After you are connected to your server/hosting, navigate to your /wp-content/themes/ folder. You will notice a folder called "crexis" there. That is the folder that you need to replace with the new one downloaded freshly from ThemeForest.
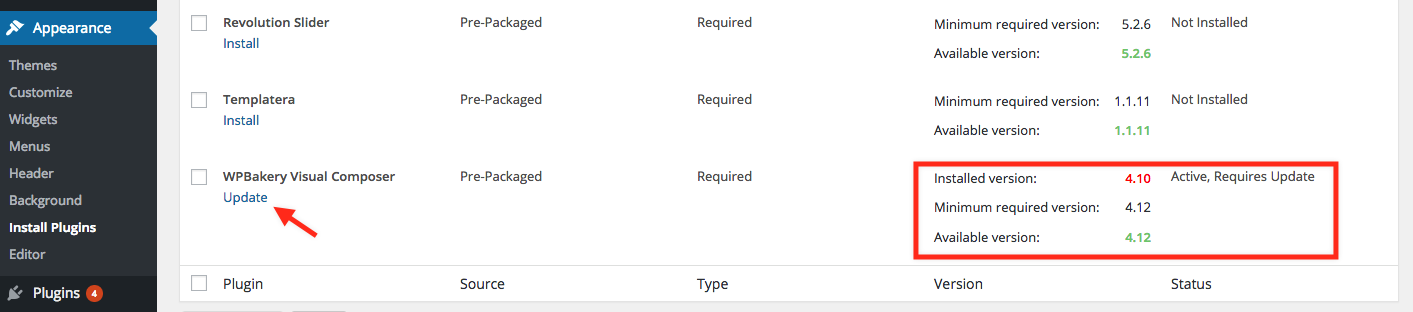
HOW TO UPDATE THE PLUGINS (such as Visual Composer):
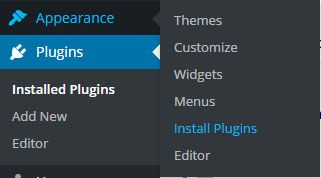
After you updated the theme to the latest version, you will be able to update the required plugins too. To update plugins just navigate to Appearance / Install Plugins menu. You will see an information next to each plugin in the "Status" column if it requires an update. If it does then just click on the update button below the plugin name:
How to update Visual Composer:
Visual Composer cannot be updated in the same way as the other plugins due to it's updating rules. Therefore we need to update VC in a slightly different way.
1. Deactivate and Delete Visual Composer.
2. Go to Appearance > Install Plugins > Select the latest version of Visual Composer available (the number will match the number listed at the top of this article).
Then just Install and Activate the plugin, following the prompts on your screen.
Done!
Revolution Slider:
Please note that doing this method you may lose your slider content and settings, it is better to use the FTP method instead for this plugin.
7. How to Improve Page Loading Times
Top Ways to Increase Website Performance and Decrease Page Loading Times
We’ve put together here a list of super easy ways to reduce your page loading times and improve the overall experience for your customers and clients.*
It is well known that if your page takes more than 4 seconds to load the customer will turn away before they have even had a chance to look at your wonderful website!
Google even indexes slow websites and ranks them at a lower position. If you want a better chance at good SEO and getting those customers and sales, you absolutely need to have a fast loading page.
How do I check the speed of my website?
There are lots of great websites that will test your website for free. And in some page testing websites they will even give you recommendations on what needs fixing. Here are our top favourite page testing sites:
As always, before doing any major edits on your website we recommend backing up your site, that way you will have peace of mind in case anything goes wrong.
We recommend ManageWP for backups (FREE or only $2 per month per website! And you can manage multiple websites with their awesome dashboard).
You can also manage and upload/update new theme and plugin versions from here.
Here are some steps you can take to help improve your website’s loading times. We’ve broken the steps down into beginner, intermediate and advanced to help you get started.
We’ve split our guide into three parts:
BEGINNER:
Image types and compression
INTERMEDIATE
Caching
Content Delivery Networks
ADVANCED
Shared Hosting
Hosting (VPS)
---------------- LEVEL: BEGINNER ----------------
Reduce the Size of Images:
This covers:
Image Size
File Type
File Size
Image Compression
Image size: Make sure the image you upload is the correct size (know your dimensions).
Fullscreen images: You’ve just designed a lovely fullscreen image for your home page hero section or slider to really ‘wow’ your customers and it looks great! But do you really need a 4000px+ size? The majority of screens that your customers use will display a HD screen size (1920x1080px) just fine.
Logo: The same goes for your logo in the menu bar. Most logo areas in the menu bar are specifically designed to fit in larger screen sizes as well as smaller screen sizes (such as in the responsive/mobile/tablet menu). Again, you don’t want a 2000px sized logo if the maximum height in the logo space is only 52px.
File type: Provide the correct file type for the purpose.
JPG: This is the most common type of image you will see on any type of publication (print or web). It’s very simple and can hold millions of different colors within it.
PNG: Similar to JPG, but this file type allows for alpha levels providing transparency. This is great as it gives you more design options, but increases the overall file size of the image.
GIF: These are typically an ‘animated’ image. GIFs are layered graphics put into a sequence to display as an animation. They can be very complex or very simple, but either way their file sizes are bigger than a JPG or PNG.
File size: Print and web images need very different sizes.
Print images need higher resolutions so that they can be printed out correctly on all different types of paper and products. They need a dpi of 300. This makes the images a lot larger in scale and file size.
Web images do not need such high resolutions because your screens display differently to paper. They only need a dpi of 72. This can help keep the images smaller in scale and in file size. You can then compress the images further without losing any visual quality.
Image compression:
Automatic: This can be done within your WordPress website itself using a plugin that will automatically compress (smush) the image sizes for you. Wordpress.org already has a great list of good plugins. You can choose which is best for you: https://wordpress.org/plugins/search.php?q=image+smush But beware this can be a big hog on your server’s resources and may slow the server down if you are on a small shared hosting.
Manual: One of the page speed test websites we love actually provide an insight to which images need compressing AND provide a copy of the compressed image for you! https://gtmetrix.com
There are also a few good websites that can compress the images for you, just run a search on Google to find the best one for you.
Caching Plugins: Using a caching plugin is probably the second best thing you can do to improve page loading times (see Step Four: Hosting for the first and best thing you should do).
Our top three plugins for WordPress for caching is:
W3 Total Cache
WP SUPER CACHE
Breeze (works even better on Cloudways servers!)
All of these work great, and it depends on your needs as well as server resources and hosting permissions.
You will need to research how to use these plugins and how they best work within your hosting, but they are very simple to get the hang of.
So sometimes you will have to do a bit of trial and error with this. Get it wrong and it can break the page, get it right and your page will now load 2-3 seconds quicker!
Minifying: Outputs all of the lines of a file onto one line making the file a lot smaller in size.
This works best for html, CSS, and most JS files. JS files are bit more tricky due to how they are loaded into page, and the location where they are loaded in.
Enable gzip compression: Like image compressing and minifying, this can be done automatically on your server. Again you will need to check if your hosting allows this.
Enable Browser cache, Object Cache, Database Cache: These can be really useful if you have repeat customers, large amounts of pages views at time and more. (Check with your hosting on what they allow).
Content Delivery Networks (CDN): A CDN is a network of geographically dispersed servers that deliver cached content from the website to the user based on the geographic location of that user.
For example, the user is in France and your website is in North America. The CDN will display a cached version of your website in France, making the page load quicker as the CDN is nearer to the user.
There are lots of great CDNs to use, with free and premium accounts available.
One of the more popular free to use CDNs is Cloudflare.
You can then link your CDN up to your caching plugin in your WordPress site.
---------- LEVEL: ADVANCED ----------
Hosting
This covers:
Shared Hosting
VPS Servers
Shared Hosting
It used to be that for decent hosting you had to buy a dedicated server which would cost hundreds of dollars per month just to make your website load faster and perform better with each request.
The other main option was to share a server which was much, much more affordable, but the downside was that you often shared the server with hundreds(!) of other websites which would all be fighting for control of the server’s resources. This is called Shared Hosting.
But over the last five years there has been a revolution in the types of servers available with a whole range of pricing structures, control options and the ability to scale (upgrade or downgrade) the servers to your specific needs. These are called VPS servers.
For WordPress websites this was great! Software evolves at an extremely fast rate and the hardware sometimes struggles to keep up (you’ll often see with computer games). So the problem that many people face today is that they still have a slow website even after completing all the steps above to improve page loading times. The software isn’t the issue -the hardware is the issue.
WordPress is a massive hog on server resources. What do we mean by server resources?
RAM
Hard drives
Bandwidth amounts
Memory allocation
etc
VPS Servers:
With a VPS server you can easily set up your very own server which has a large amount of resources and even upscale it if you need more! Their pricing is fantastic as well, starting from just $7 a month.
Not only that, you have the ability to control pretty much all of the settings on the server without any restrictions normally imposed by a Shared Hosting account.
Need to add more RAM? Done.
Need to use a faster hard drive such as a SSD? Done.
Need a large bandwidth amount? Done.
Need to increase your WordPress memory allowance? Done.
You get the point… :)
However, this does often mean that you will need to have quite an extensive specialist knowledge of the command line code to set all of this up (which is a big leap from being just a website designer or WordPress user).
Eek!
This is where managed VPS servers come into the picture. These servers are managed by the specialist hosting company and they have set up a very easy to use control panels for you, instead of you having to learn all that command line code stuff!
In this day and age there is no reason not to be using a VPS server for your WordPress website.
Here are our two favourite companies for VPS servers:
We wouldn’t recommend these two if we weren’t using them ourselves. They have fantastic support, software and services. (We’ve done a lot of trial and error with many different companies over the years so believe us when we say we recommend them).
*Please note that we do not provide support for any of the plugins or software in this article. By following the information in this article you do so at your own risk and we accept no responsibility for any loss or error of content or database. Make sure you backup your website and work often.
If you are looking for a professional WordPress customization services then you don't need to look any further. We've just launched Veented Studio where you can hire us for any WP and Web related tasks:
A child theme is a theme that inherits the functionality and styling of another theme, called the parent theme. Child themes are the recommended way of modifying an existing theme. If you modify a theme directly and it is updated, then your modifications may be lost. By using a child theme you will ensure that your modifications are preserved.
How to install a Child Theme?
First of all, make sure that you have downloaded "All files & documentation" archive from ThemeForest:
After you unzip the archive you will find a file "crexis-child.zip". That's the child theme.
Navigation to Appearance / Themes menu and click on the "Add New" button:
On a new page, click on the "Upload Theme" button and the upload form will appear:
Just select the crexis-child.zip file, click "Install Now" button and the upload process will begin. After it's done, just click on the "Activate Theme" button. Done!
11. How do I update my theme and plugins?
It's very quick and easy to update your theme and plugins. We written a guide for each of the main themes if you need help.
Please make sure your theme and plugins are up-to-date BEFORE you send a support ticket.
On 20th of September 2016, we've added two awesome, very popular, premium plugins (total value of $44) for three of our themes: Crexis, Waxom and North. These plugins are now a part of theme which means you can use them for free in your personal projects:
1. Essential Grid - Essential Grid is a premium plugin for WordPress that allows you to display various content formats in a highly customizable grid. Possible applications range from portfolios, blogs, galleries, WooCommerce shops, price tables, services, product sliders, testimonials and anything else you can imagine.
2. Ultimate Addons for Visual Composer - This plugin adds several premium elements in your Visual Composer on top of the built-in ones given by WPBakery. Every single element in the package is crafted with utmost attention to details and a simple objective to provide you an ultimate experience.
Licence Keys:
It may ask about plugin activation, you can dismiss it. Plugins that are bundled with themes do not come with additional license keys for them. It's the same case for all themes among ThemeForest market.
You can of course activate those plugins by purchasing separate license codes for them but that will only add "premium features" like automatic updates. The "standard" functionality will remain the same.
Where do I find the new plugins?
New plugins are not included within the Appearance / Install Plugins menu as they are absolutely optional so we decided to not increase the theme's package size. You may find them in the /Plugins/ folder in the main theme package. If you're not sure how to get the "main theme package", please log in to your ThemeForest account, go to Downloads tab and next to the theme name click on the "Download" button and a dropdown menu will popup:
Click on the "All files & documentation" link and the download process of a big .zip file will begin. After you unzip it, you will find a "Plugins" folder inside containing two new plugins, including the installable .zip and documentation:
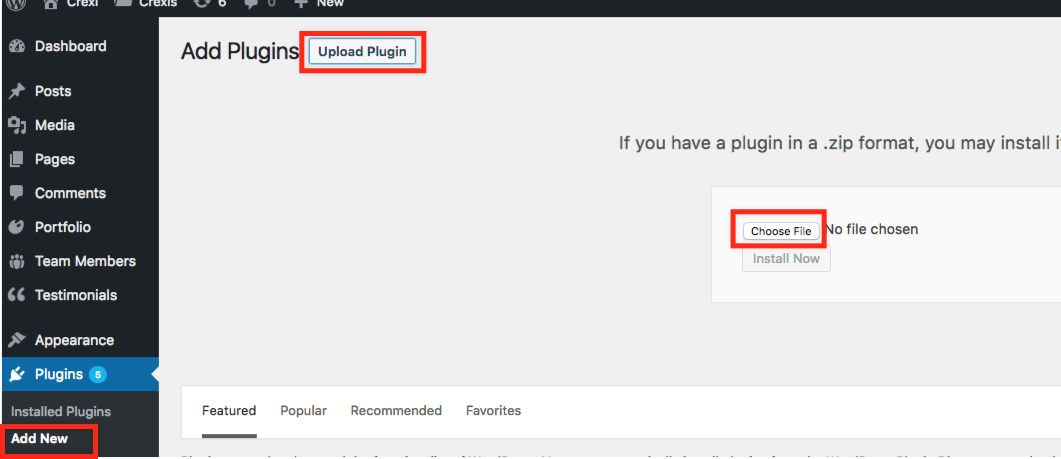
How to install new plugins?
As you can see on the screenshot above, each folder contains a .zip file (like essential-grid.zip), that's the plugin itself. Log in to your WordPress dashboard, go to Plugins / Add New, click on the "Upload Plugin" button on the very top and then the "Choose file" button in the upload form. Select the plugin .zip file described above:
And then proceed with the installation process ending with the plugin activation. Good luck!
13. WPBakery Visual Composer, Revolution Slider, Layer Slider and other plugins ask for activation key
If you see a notice from the WPBakery Visual Composer, Revolution Slider, Essential Grid and Layer Slider plugin about plugin activation, you can dismiss it. Plugins that are bundled with themes do not come with additional license keys for them. It's the same case for all themes among ThemeForest market.
You can of course activate those plugins by purchasing separate license codes for them but that will only add "premium features" like automatic updates. The "standard" functionality will remain the same.
So how can you update those plugins?
We provide the latest plugin versions in each theme update so just make sure that you have the latest theme version installed and you may be sure that it comes with the latest plugins version too.
Just follow these steps:
1. Deactivate and delete the plugin
2. Go to Appearance > Install Plugins
3. Select the plugin from there and install and activate
That will now be the latest version of the plugin bundled with the theme.
You can always compare the version numbers from which you have installed to which version is available with your theme here: https://veented.ticksy.com/article/7962/
14. How to add custom CSS code?
It's very easy to add a custom CSS code to your theme. There are two ways to do so:
1. Theme Options panel
You may add your CSS code directly via the Theme Options panel. Just navigate to Crexis / Advanced tab and paste your code into the "Custom CSS" field:
Don't forget to "Save Changes" after you are done.
2. Theme's stylesheet
You can paste your CSS code directly to your theme's style.css file. Just navigate to Appearance / Editor menu and paste your code at the bottom of the theme's style.css.
Note: it's recommended to use a Child Theme when adding your custom CSS code to the theme's stylesheet directly. Check this article to learn how install a Child Theme.
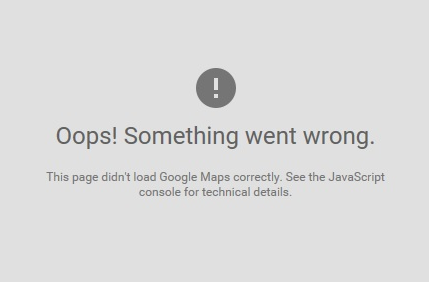
15. Google Maps not working
Since few days, some of you may encounter an issue with their Google Map element:
Google provides the Google maps service for free, but — due to a change of the policy — this service now requires a valid key for the site displaying and using the maps. Sites that used the API without a key prior to June 22, 2016 have been grandfathered to allow them to continue to work.
There are currently two solutions out of this situation:
Use the native Visual Composer Google Maps element where you can insert the map iframe element - doesn't require API at all.
Create the API key and use the custom stylized Google Map element from the theme. Please continue reading to learn how.
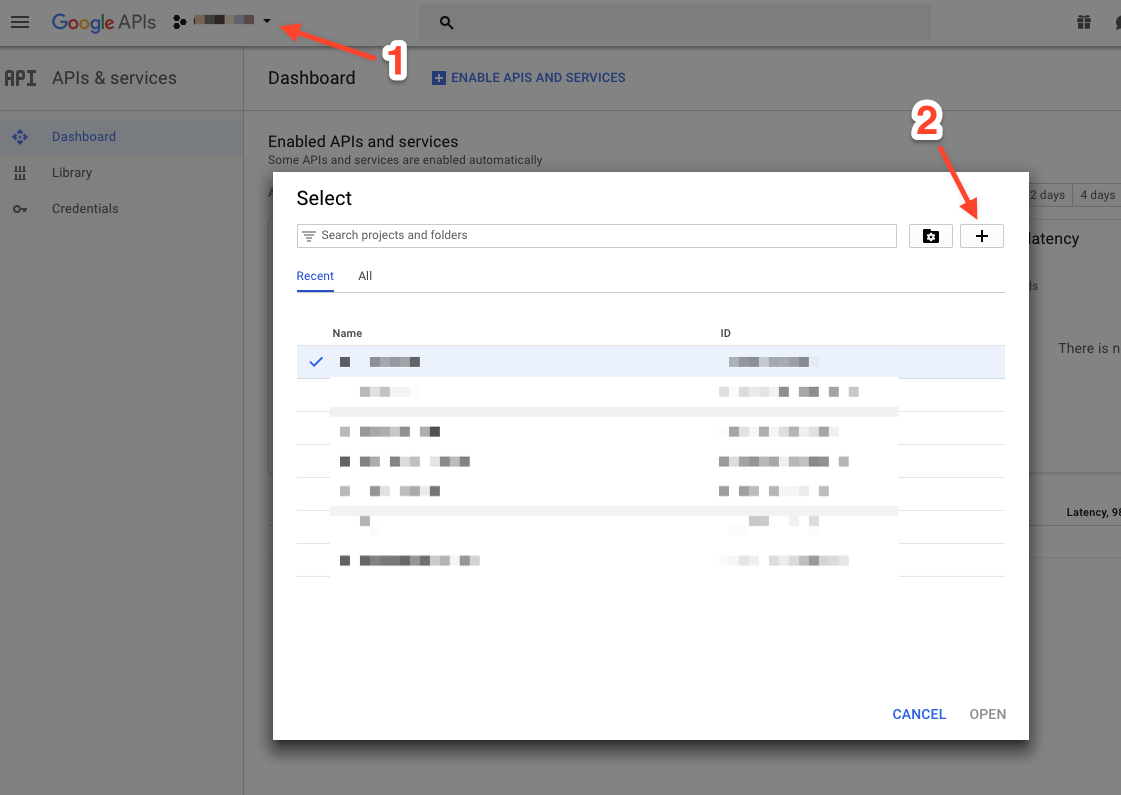
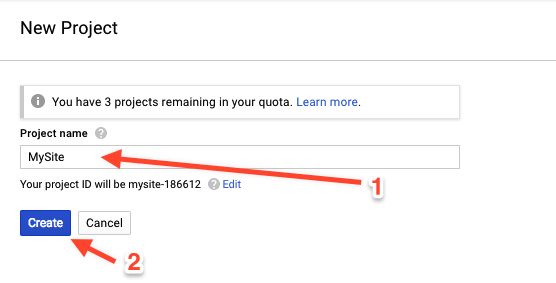
A small popup window will shop up where you can insert your project name. It can by anything, like your site name for example. When you're done, click "Create":
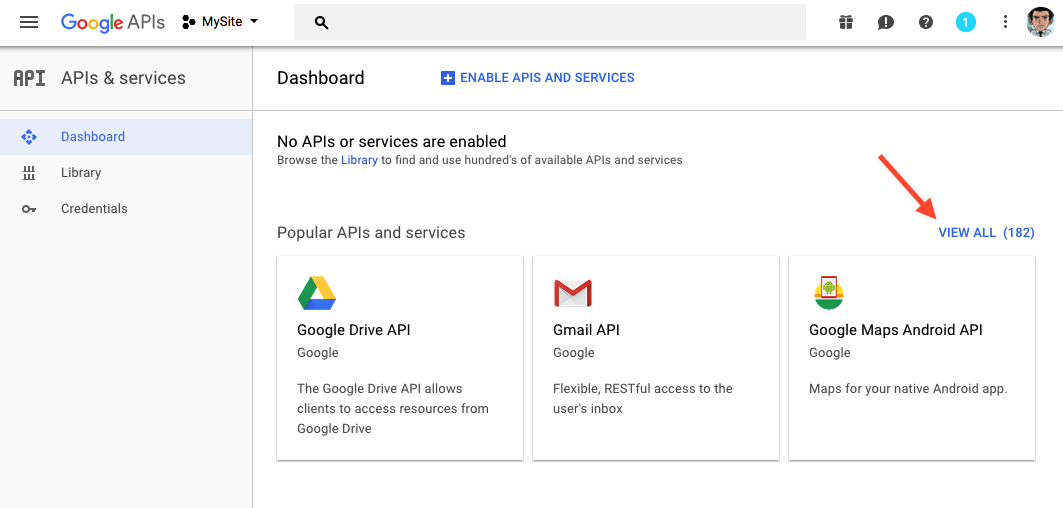
2. After the project is created, a list of popular API services will appear. Click "View All" on the right to see a full library:
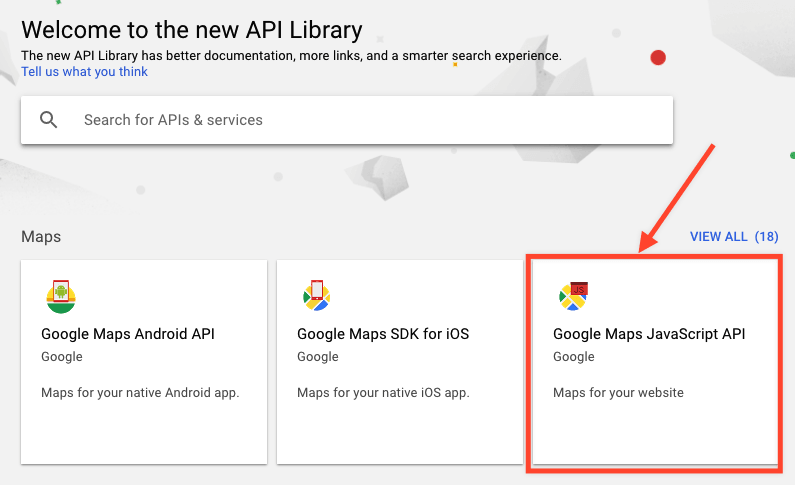
Choose "Google maps JavaScript API":
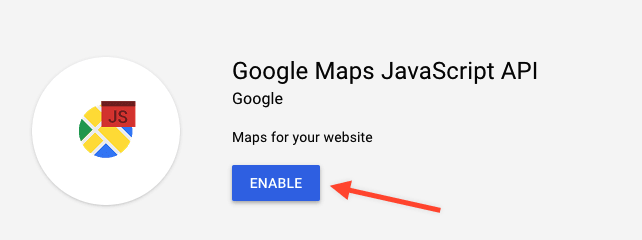
Click the "Enable" button:
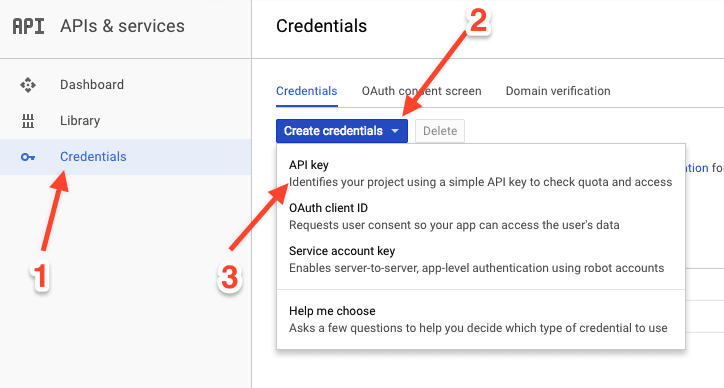
3. Now, you will need to create the API credentials: Visit Credentials tab (click on the menu item in right sidebar), click the "Create credentials" button and from the dropdown menu choose "API Key":
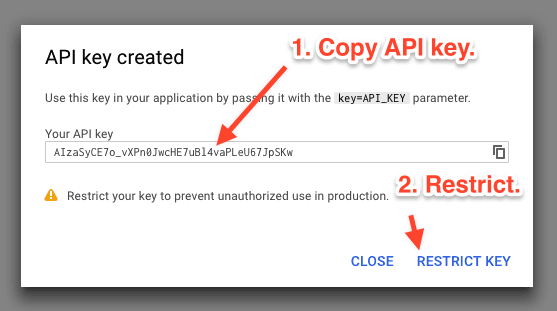
A popup window will appear with your new API key. Copy it and then click "Restrict Key" button:
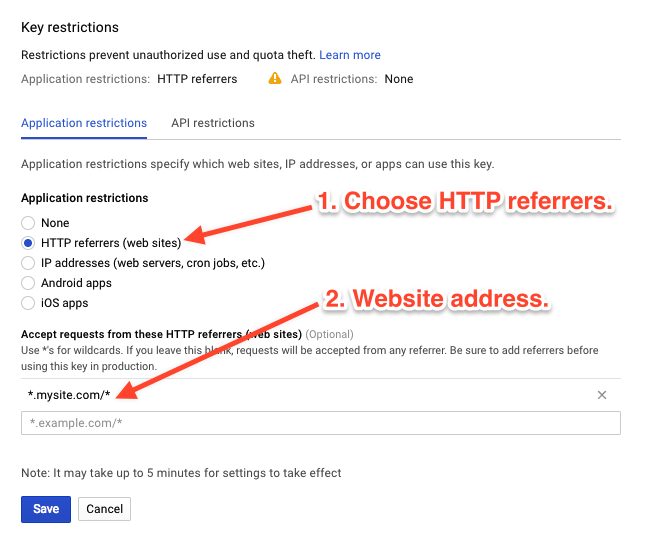
After clicking the "Restrict Key" button, you will be presented with the following form:
Under Application restrictions check HTTP referrers (web sites) and then type your website address in a universal form, like *.mysite.com/* that allows access from all your subdomains and subpages. When you're done, just click the "Save" button.
Done!
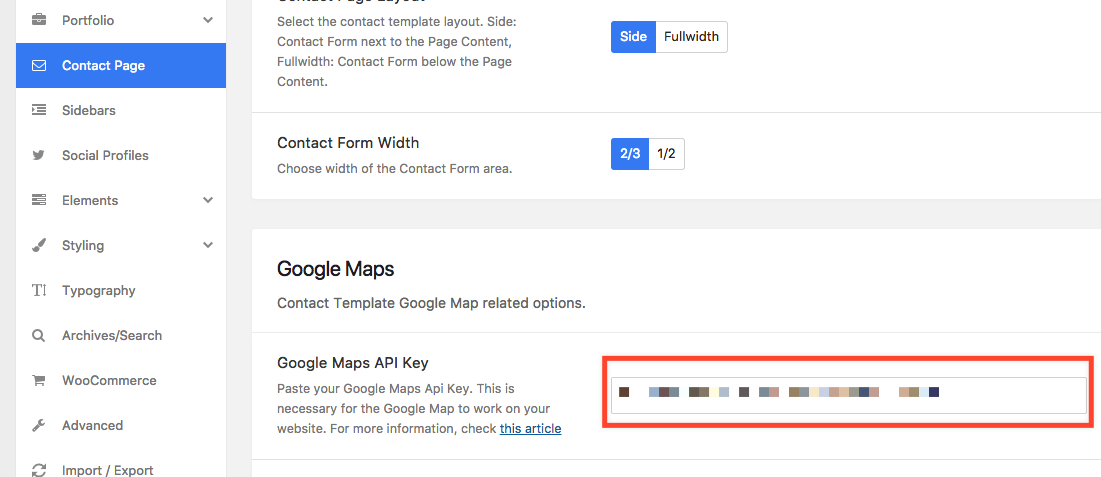
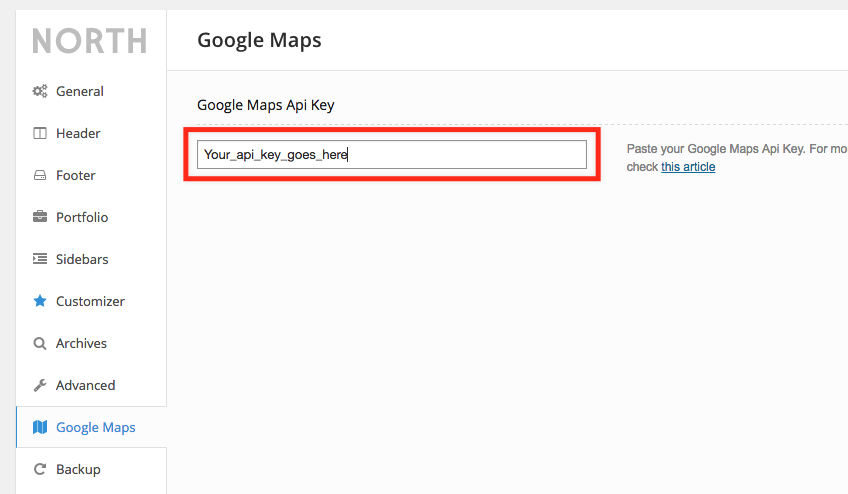
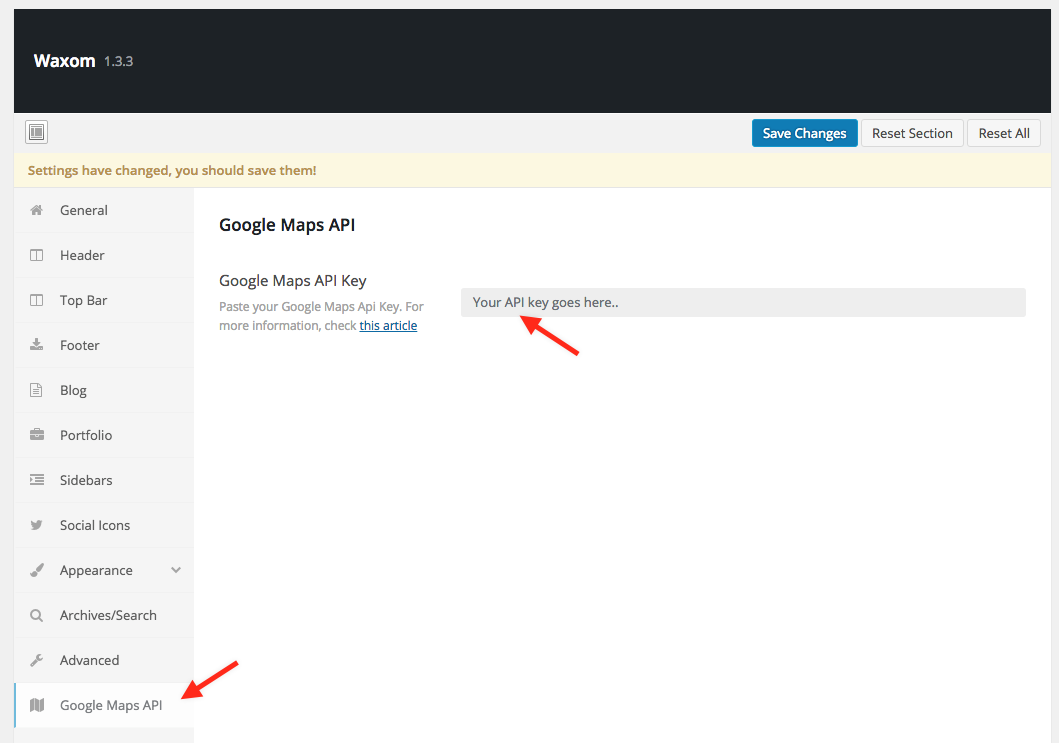
5. Now, all you need to do is paste your API key in the Theme Options / Google Maps / Google Maps API Key field. The field location may different, depending on which theme you use:
Engage: Theme Options / Contact Page / Google Maps Api Key:
North & Qaro: Theme Options / Google Maps / Google Maps Api Key:
Waxom & Crexis: Theme Options / Google Maps API / Google Maps Api Key:
Now save the Theme Options panel and you are again able to use the stylized Google Map element.
16. How do I access the old Support Forums?
Our old Support Forums is still available but no new threads can be created.
You may use it to find answers to hundreds of questions in over 3000 threads:
Before the Top Bar content located on the left side of the Top Bar.
crexis_before_top_bar_right
Before the Top Bar content located on the right side of the Top Bar.
crexis_before_navigation
Before the main site navigation bar.
crexis_before_page_content
Before the main page content area.
crexis_before_page_title
Before the Page Title area.
crexis_after_page_title
After the Page Title area.
crexis_before_footer_widgets
Before the Footer Widgets area.
crexis_before_footer
Before the Footer Bottom Bar (the one that holds the copyright text).
crexis_after_footer
After the entire Footer area.
Example usage (in the child theme's functions.php file):
function my_site_new_footer_content() {
    echo 'Hello there! I am in a footer!';
}
add_action( 'crexis_after_footer', 'my_site_new_footer_content' );
Filters
As for now, only one filter is available that allows you to change the portfolio post type slug (used in the URL). To change the portfolio post slug, please use the following code:
function my_site_portfolio_slug( $portfolio_slug ) {
    return 'works'; // New portfolio slug
}
add_filter( 'crexis_portfolio_slug', 'my_site_portfolio_slug' );
After doing so, please reset your Permalinks (go to Settings / Permalinks, change them back to default, save and then change back to pretty permalinks).
18. Getting Map Coordinates (lat,lng)
The easiest way to get lat and long (lng) coordinates from an address is to use the following website:
For "Paris, France" it would be: 48.856613,2.352222
19. WordPress 5.5.* Update & WPBakery issues
Dear Customers,
WordPress 5.5.* brings a lot of changes, especially regarding jQuery so it affects hundreds of different themes and plugins. If you're not sure all your plugins fully support the latest WordPress version, we advise against the upgrade.
Regarding our themes, we've updated all of them shortly after the new WordPress version was released to address theme-related issues.
Theme Update
First, please make sure to update your theme to the last version and make sure to update an associated "Theme_Name Core" plugin as well (e.g. North Core, Waxom Core, etc).
For update details, please check the following article:
We also strongly advise installing the Envato Market plugin for automatic updates:
https://envato.com/market-plugin/ (but you might need to temporarily disable the theme for this plugin to work properly before the crucial theme update that resolves some issues).
Core Plugin Updates
Once you update the theme to the latest, make sure to update an associated Core plugin (instructions can also be found in the link above or you can just go straight to the Appearance / Install Plugins menu once the theme is properly updated to the latest version):
North theme - North Core plugin
Waxom theme - Waxom Core plugin
Crexis theme - Crexis Core plugin
Engage theme - Engage Core plugin
Purity theme - Purity Core plugin
Plugin Updates
Once you update the theme and the core plugin, make sure to update all bundled plugins, especially the WPBakery Page Builder plugin - it has to be at least 6.3.0 version installed on your website.
Clear Browser Cache
Many of our clients reported they were still experiencing issues after doing all of the above. After clearing the browser cache, the issue was gone:
If that doesn't help then it means it could be caused by some of your other plugins and we advise contacting the plugin author.
If none of the above helps, we advise that you temporarily downgrade to an older version of WordPress. However, all clients that contacted us about this have had their problem resolved by doing things listed above.