18. How to change the Engage Slider font sizes on smaller devices
19. How do I update the Engage theme?
20. Google Maps Geocoding
21. Getting Map Coordinates (lat,lng)
22. WordPress 5.5.* Update & WPBakery issues
23. Engage Theme Hooks
24. Generating a Personal Token
1. Engage Theme Documention
Theme Documentation
An extensive Theme Documentation can be found in the "Documentation" folder in the theme's main package that you can download from your ThemeForest account.
If you're missing any information in the documentation, please let us know about it and we'll be glad to resolve it right away! Just open a new ticket and send us more details.
2. Video Tutorials
You may find all Engage narrated video tutorials on our official YouTube playlist.
Here is an individual video list:
1. Theme Installation, Setup, Demo Site Import and Overview
The video will show you how to install the theme, import one of the demo sites and we will give you a quick overview of the main theme features including Engage Templates!
This video will show you how to perform a manual setup of the theme (in case you don’t use our wizard and don’t import any demo site). You can learn some of the basic WordPress features.
We didn’t forget about those who are completely new to WordPress. In this video, we will show you step-by-step how to create a blog page and posts in various formats from scratch.
If you would like us to record a video tutorial about any other aspect of the theme - please let us know! Just create a new ticket and we'll be glad to hear your opinion.
3. Theme Installation, Setup & Demo Content
Documentation
You can learn how to install and setup the theme along with a quick tutorial about importing a demo site in this part of the Theme Documentation file:
We also recorded a narrated video tutorial where we will show you step-by-step how to upload, install, activate and setup the theme. In the video we will also show you how to import a Demo Site and give you a quick overview of the main theme features.
4. Setting Front Page, Navigation, Footer Widgets
To learn how to set a static front page on your website, create a simple navigation and add wigets, please watch the video below.
Note: You don't need to do any of the following if you decide to import one of the Demo Sites.
5. Theme Options
Documentation
You may learn more about the powerful Theme Options panel in the Theme Documentation file:
You may also watch our narrated video tutorial where we will show you step-by-step how to setup the contact form, configure Google Maps and create a contact page:
10. Blog Page & Posts
In the video below, we will show you step-by-step how to create a blog page and posts of various formats:
11. Header
You may learn more about the Header section of your website in the Theme Documentation file:
To learn how to customize your website's Header both globally and individually for particular posts or pages, please visit the Theme Documentation file:
Even if it's a small suggestion, don't be afraid to post it in the ticket and we'll have a look at getting it built and added into the next main theme update.
Thanks! :D
18. How to change the Engage Slider font sizes on smaller devices
To change the size of Engage Slider texts (heading, subtitle and top heading) on smaller screens, please use a the following Custom CSS code:
You can paste the code inside the Theme Options / Advanced / Custom CSS area.
1000px means the code affects screens smaller than 1000 pixels in width. You can adjust that to your needs or use the code multiple times.
Advanced: to affect a slider just on a particular page, please add the ID selector to the CSS code i.e: ".page-id-154 #wrapper .veented-slide..." where "154" is the unique ID of that WordPress page. You can also add a unique ID to the row (in WPBakery Page Builder) that contains the slider and use it as a selector i.e. "#row_id .veented-slide...
19. How do I update the Engage theme?
In this article, you will learn how to update the Engage WordPress theme.
SCROLL DOWN to see how to update the plugins: Engage Core and WPBakery Visual Composer.
Please note that updating WPBakery to a version newer than the one listed above is done so at your own risk.
1. How do I update the theme?
There are two ways of updating the Engage theme: automatic and manual. You will find more information about each one below.
1a. Automatic Updates
Since 2.0 version of Engage, automatic updates are available. Before you begin, please make sure that you have the latest theme version installed (you may reach the 2.0 version by following the manual theme update tutorial located at the end of this article).
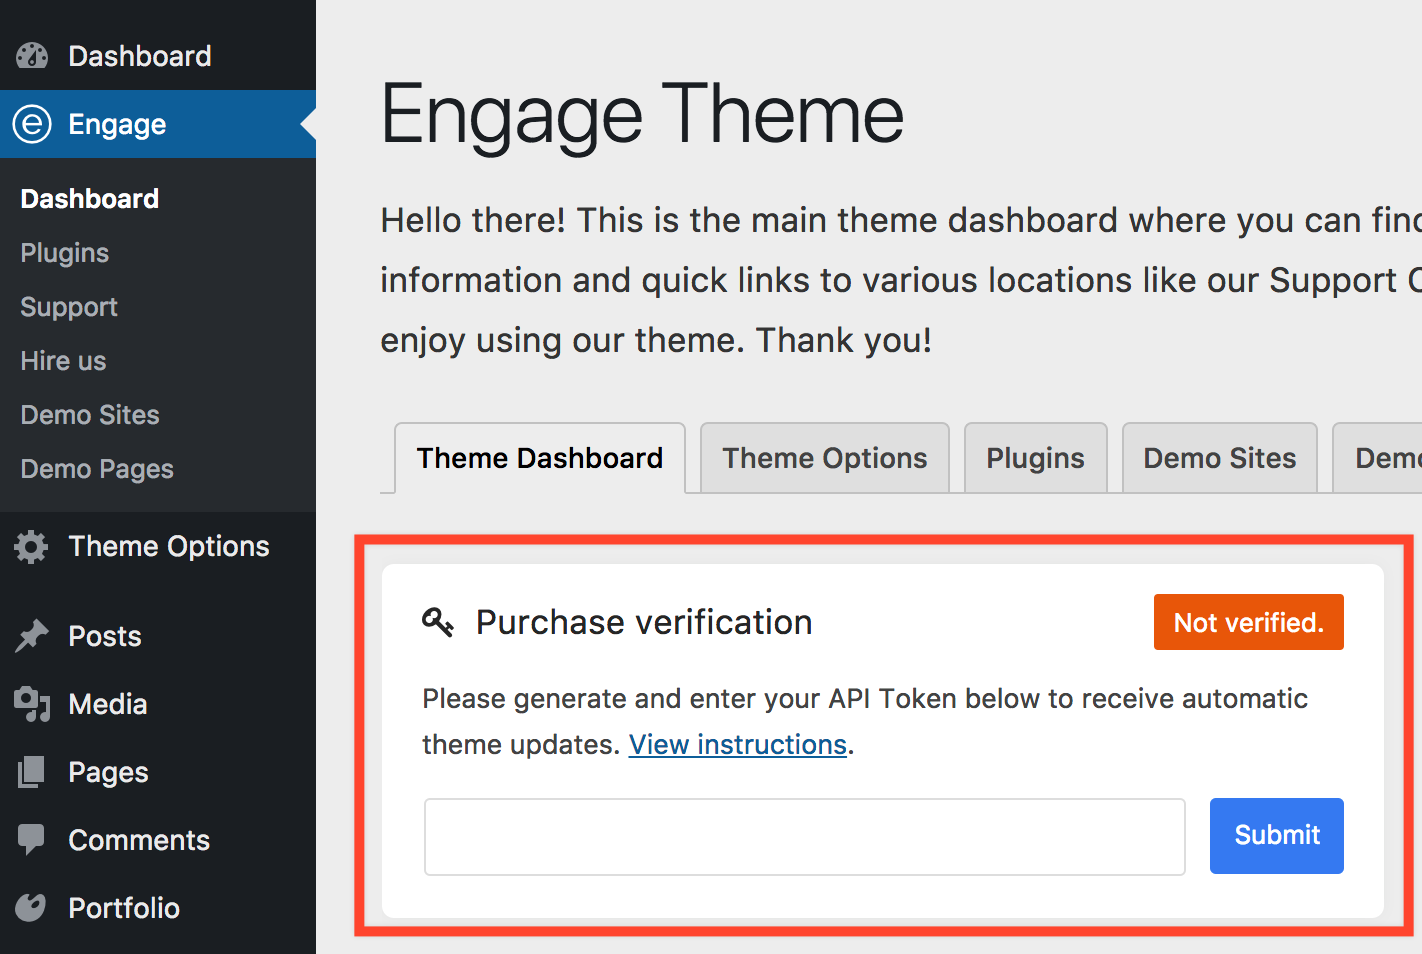
To activate Automatic Updates, please visit the Theme Dashboard (Engage / Dashboard). There, you will see a "Purchase Verification" area:
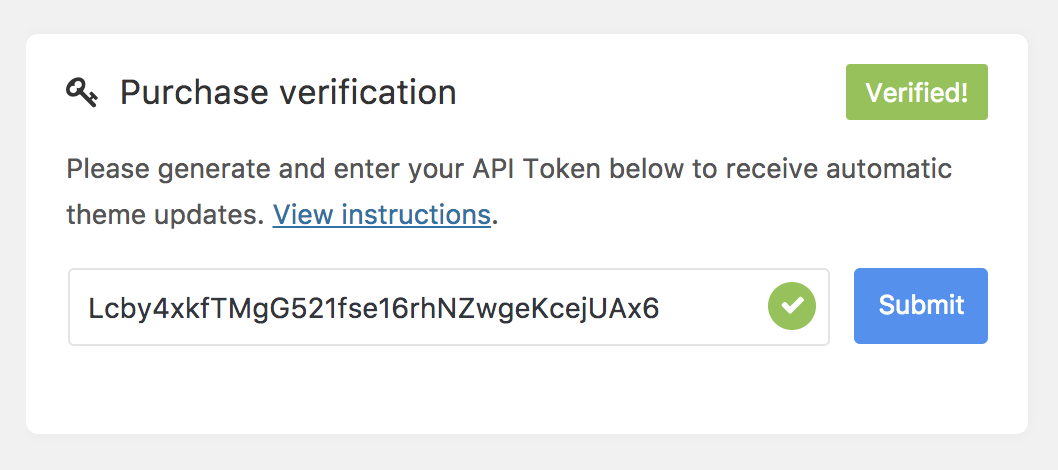
Please verify your purchase by generation your Personal Token following this article. When you're done, you should see the following:
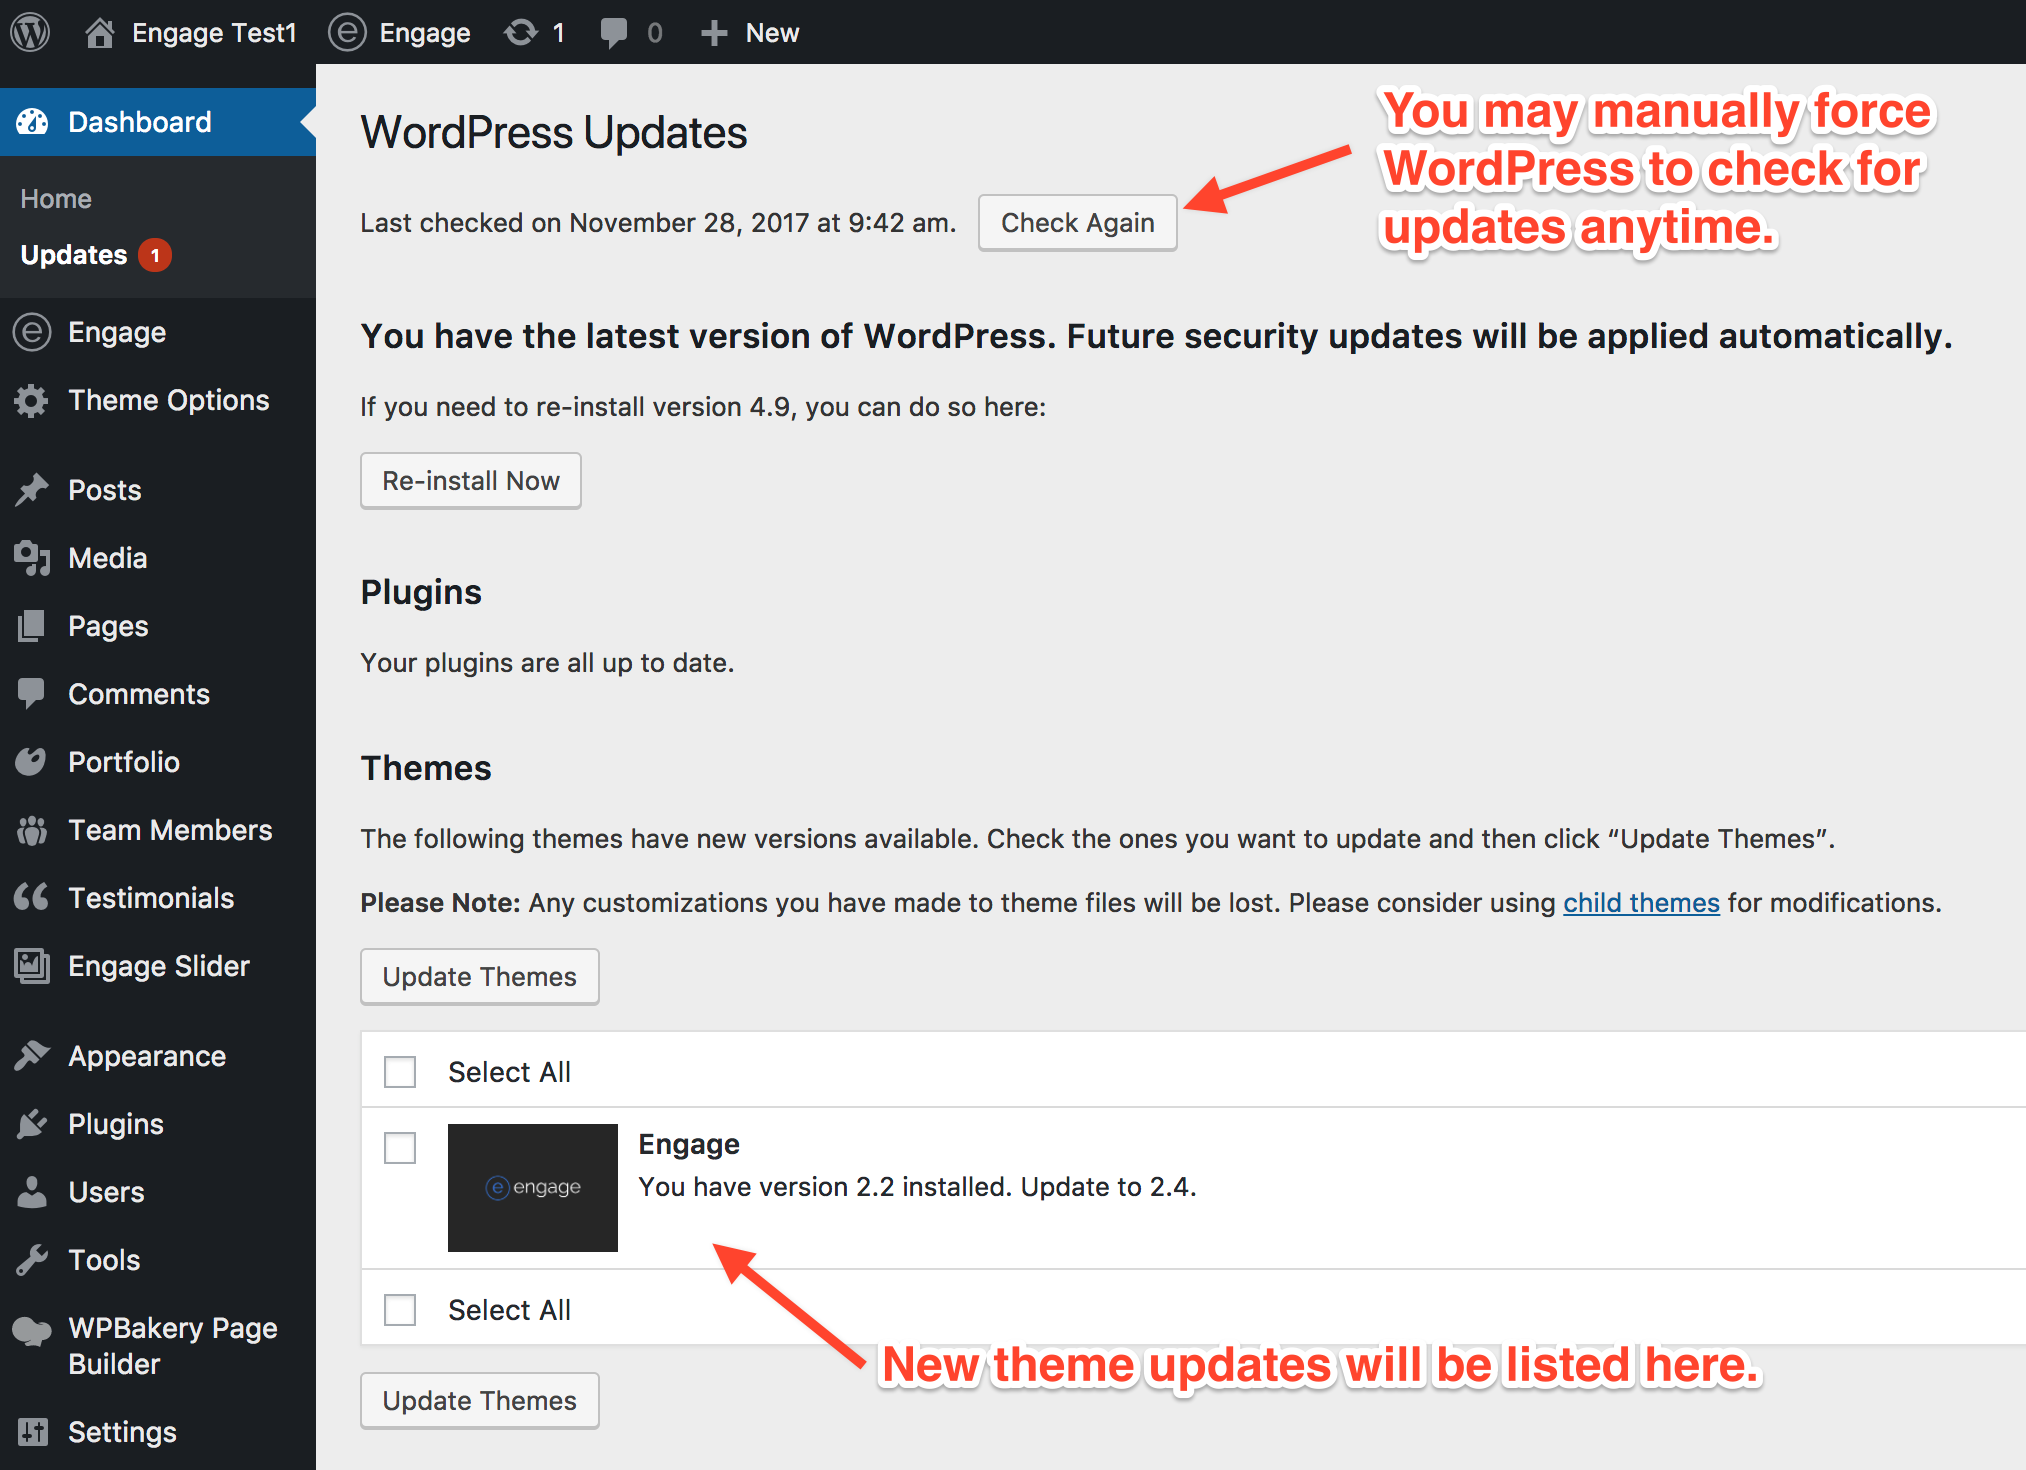
From now on, you will be automatically notified about new theme updates via native WordPress update tool. The Update dashboard can be found in Dashboard / Updates menu:
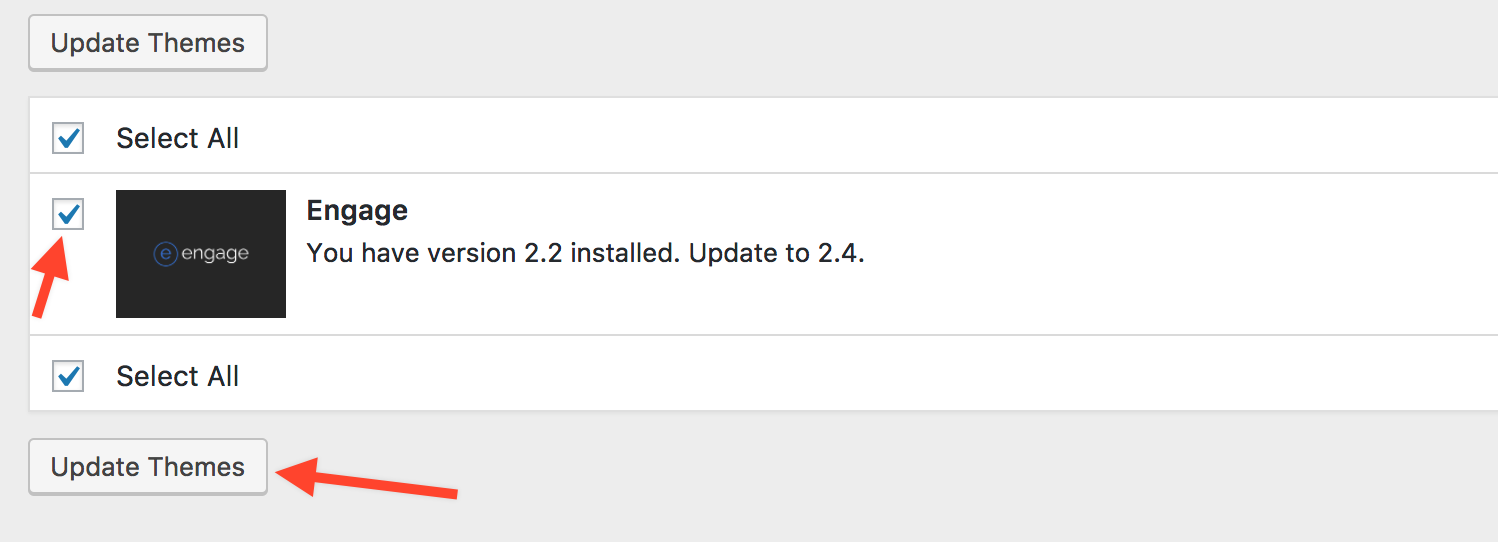
WordPress by default checks for updates every 12 or 24 hours (depending on the configuration). However, you may always force a check by clicking on the Check Again button shown on the screenshot above. If there are any theme updates available, they will be listed under the Themes area. You may update the theme from the panel above by checking the checkbox next to the Engage theme and clicking on the Update Themes button:
The theme will begin to update to the latest version.
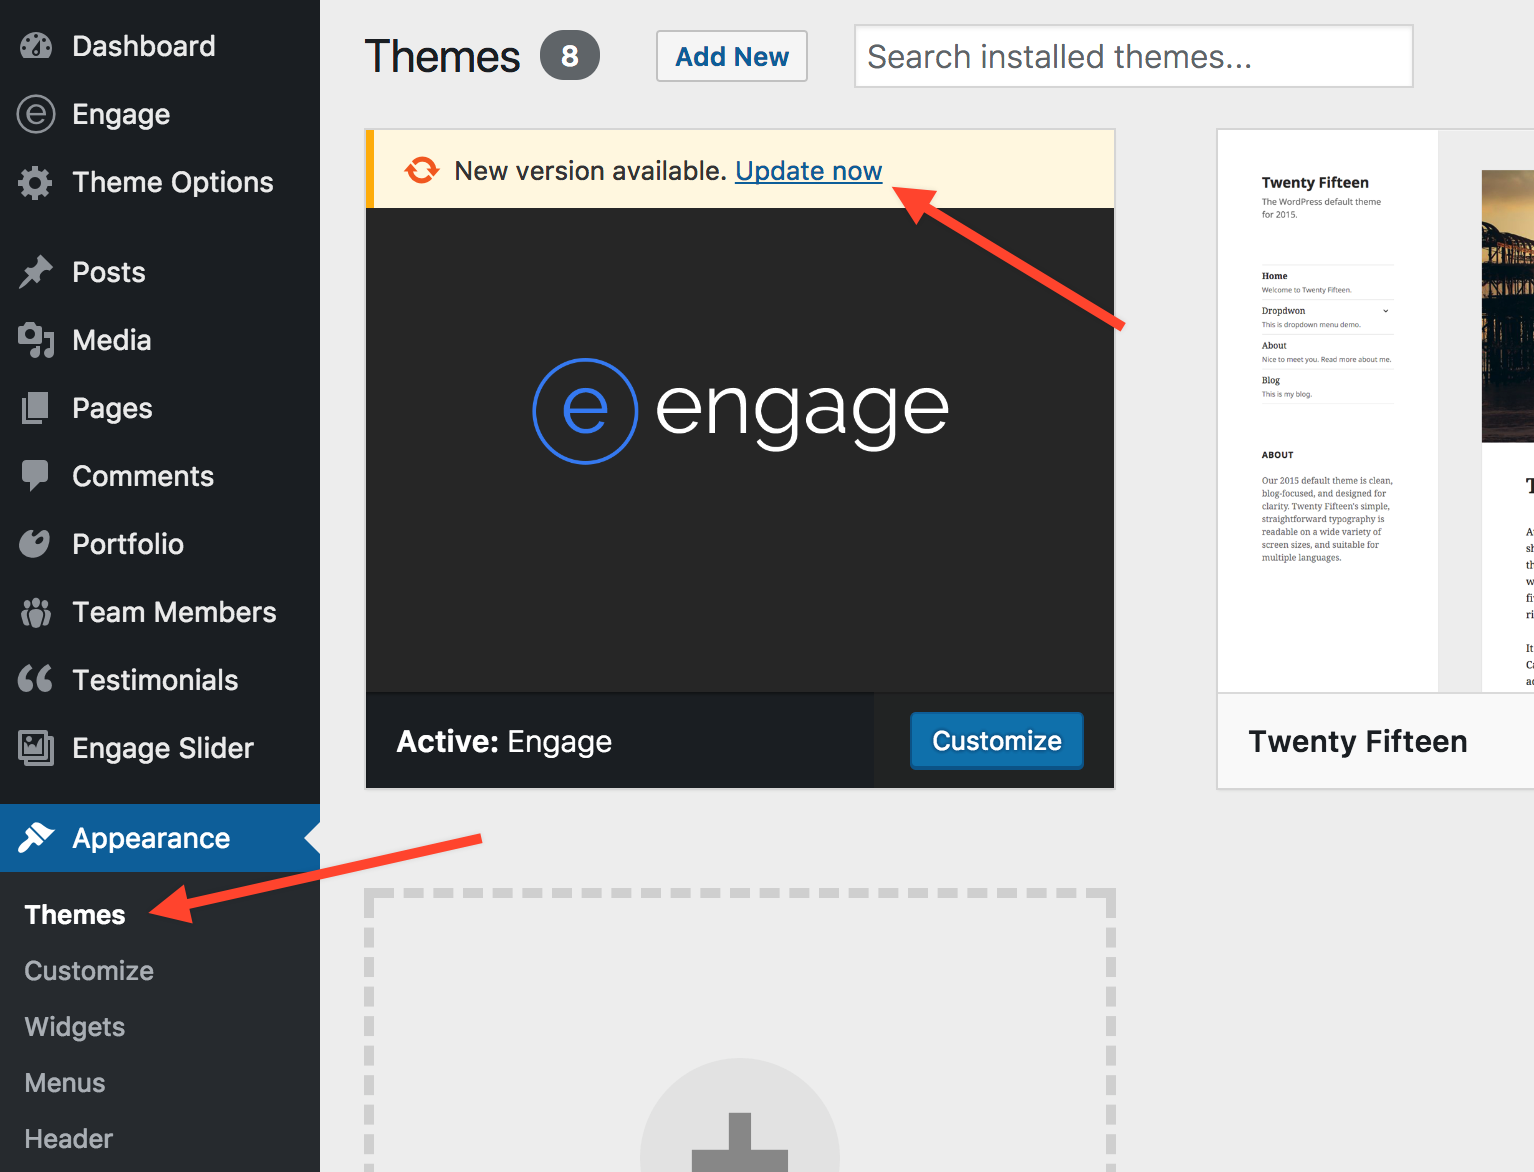
You may also update it directly from Appearance / Themes menu. Whenever a new theme update is available, it will be presented like below:
It is really up to you which way you choose. :)
After you update the theme, make sure that you update all installed plugins as well (please scroll down to Updating Plugins section of this article).
1b. How do I update the theme manually?
You may of course update the theme manually too. Just follow these simple steps:
1. Go to the Downloads page on ThemeForest, find the Engage theme, click the Downloads button and from the dropdown list select “Download latest All files & documentation file” or “Installable WordPress file only”.
2. If you downloaded “All files..”, extract the big .zip file and find engage.zip inside. If you downloaded just the “Installable WordPress file” then the downloaded .zip is the one you are looking for (you can rename it to engage.zip).
3a. Option A (faster & easier): log in to your WordPress dashboard, navigate to Appearance / Themes, activate another theme (so Engage is deactivated). Once you do so and while still being on Themes page, click on Engage and choose “Delete” in the bottom right corner. Delete the theme. Now upload the engage.zip file as you would install a brand new theme on your website.
3b. Option B (slower): Unzip the engage.zip file on your computer. Next, using an FTP client like FileZilla or cPanel if you have it, go inside your server to this file directory:
/wp-content/themes
and delete the engage folder. Once that is done deleting (it may take a while if you have a slow hosting service), upload the new engage folder that you have unzipped at the beginning of this Option 3b. The process depends on your upload speeds and your hosting speeds.
Note: Following this method, none of existing content or settings will be lost (Option B).
Please note that we do not include licences for the 3rd Party plugins bundled with the theme. They come ‘as is’ and we provide updates for them with the theme updates. You do not have to purchase licences for them.
Whenever there is a new version of a plugin available, the theme will display a notification box like below:
To update them, just click the Begin updating plugin button. You may also update your plugins by either visiting the Engage / Plugins menu and clicking the Update Plugin button:
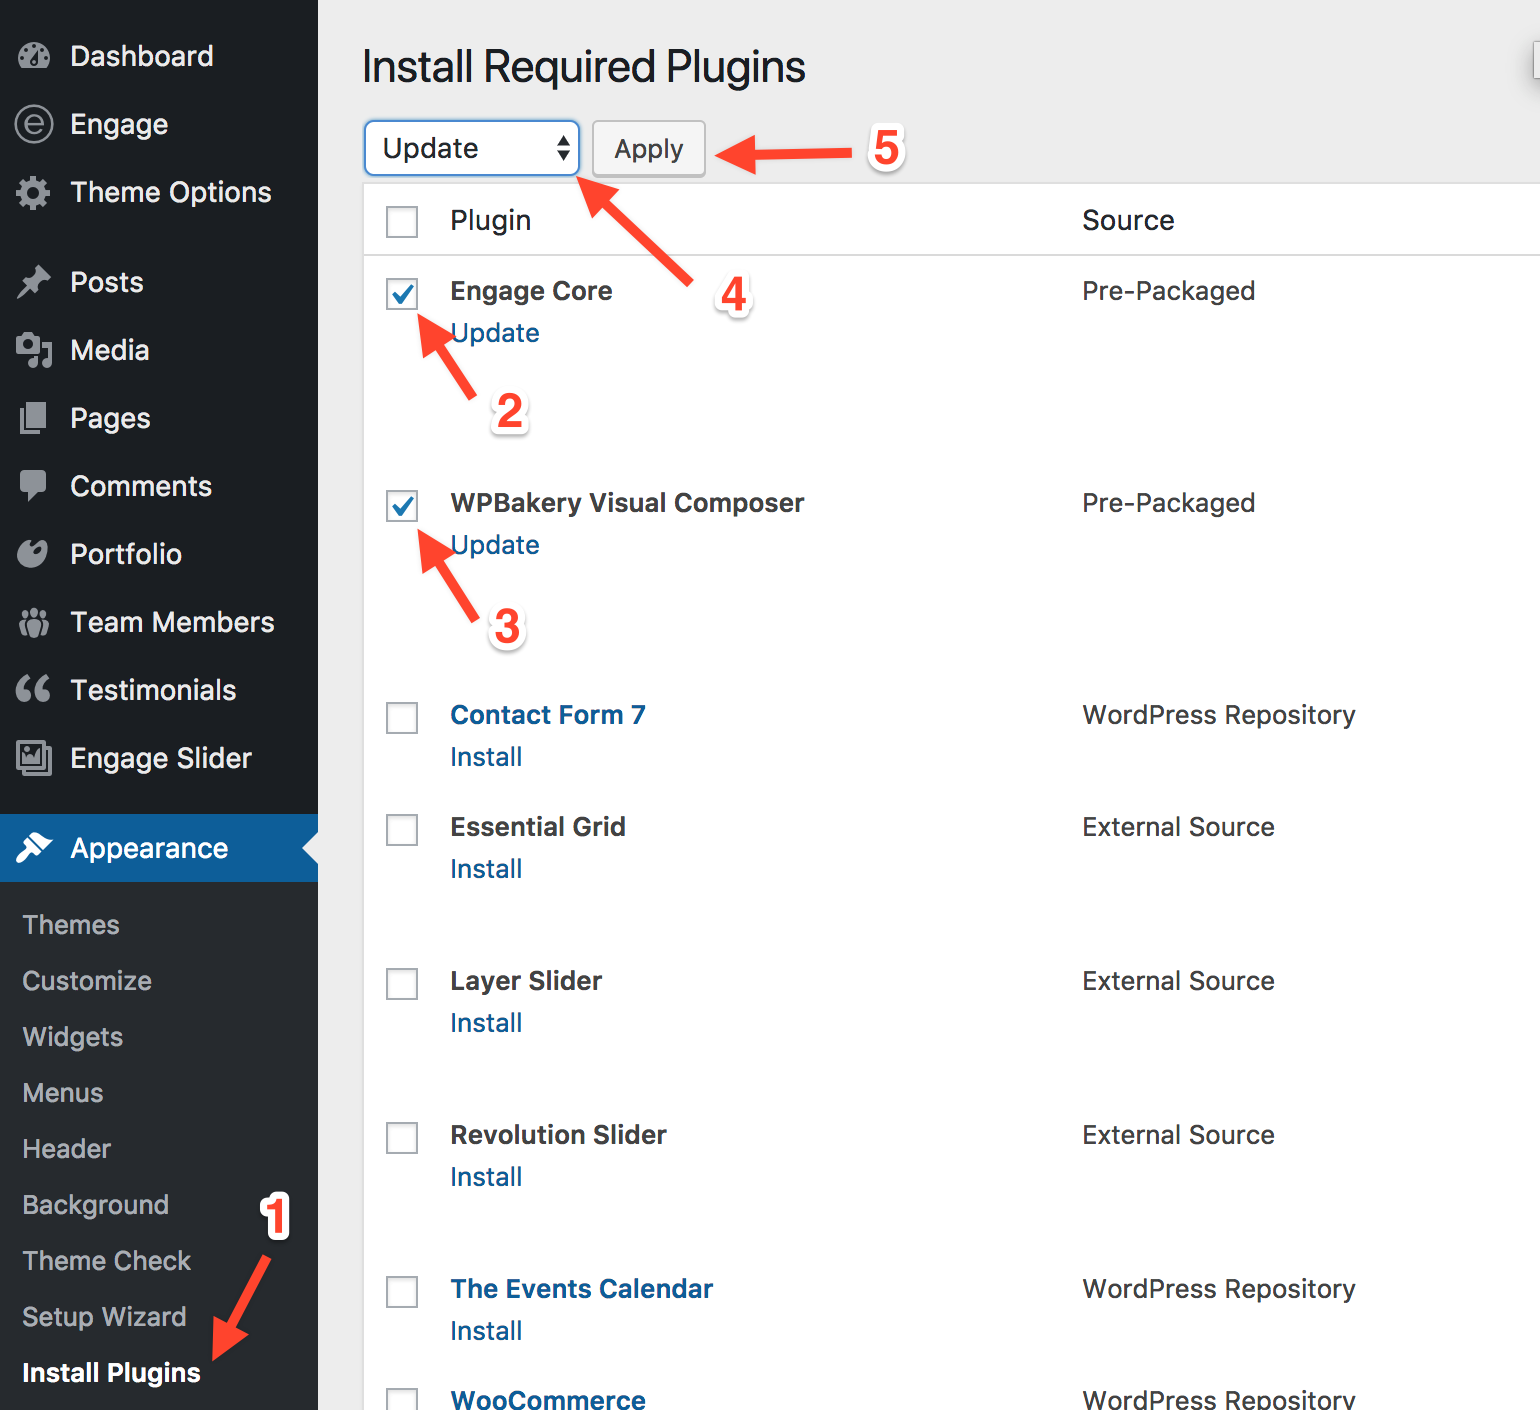
Or if you prefer a more "old-fashioned" way, where you can also update multiple plugins at once, just visit the Appearance / Install Plugins tab:
In case you have any troubles updating a plugin, we suggest the following steps:
Deactivate and delete the plugin (in Plugins tab).
Install and activate the plugin from scratch by either visiting Engage / Plugins or Appearance / Install Plugins menu.
20. Google Maps Geocoding
Since July 2018, Google Maps Geocoding is no longer a free service. That's why using the location address in it's text form (i.e. "Paris, France") won't work in our theme by default anymore.
There are two ways around it:
1. Insert the location in the "lat,lng" format. To obtain those coordinates, you may use a simple service like:
For "Paris, France" it would be: 48.856613,2.352222
22. WordPress 5.5.* Update & WPBakery issues
Dear Customers,
WordPress 5.5.* brings a lot of changes, especially regarding jQuery so it affects hundreds of different themes and plugins. If you're not sure all your plugins fully support the latest WordPress version, we advise against the upgrade.
Regarding our themes, we've updated all of them shortly after the new WordPress version was released to address theme-related issues.
Theme Update
First, please make sure to update your theme to the last version and make sure to update an associated "Theme_Name Core" plugin as well (e.g. North Core, Waxom Core, etc).
For update details, please check the following article:
We also strongly advise installing the Envato Market plugin for automatic updates:
https://envato.com/market-plugin/ (but you might need to temporarily disable the theme for this plugin to work properly before the crucial theme update that resolves some issues).
Core Plugin Updates
Once you update the theme to the latest, make sure to update an associated Core plugin (instructions can also be found in the link above or you can just go straight to the Appearance / Install Plugins menu once the theme is properly updated to the latest version):
North theme - North Core plugin
Waxom theme - Waxom Core plugin
Crexis theme - Crexis Core plugin
Engage theme - Engage Core plugin
Purity theme - Purity Core plugin
Plugin Updates
Once you update the theme and the core plugin, make sure to update all bundled plugins, especially the WPBakery Page Builder plugin - it has to be at least 6.3.0 version installed on your website.
Clear Browser Cache
Many of our clients reported they were still experiencing issues after doing all of the above. After clearing the browser cache, the issue was gone:
If that doesn't help then it means it could be caused by some of your other plugins and we advise contacting the plugin author.
If none of the above helps, we advise that you temporarily downgrade to an older version of WordPress. However, all clients that contacted us about this have had their problem resolved by doing things listed above.
23. Engage Theme Hooks
Engage comes with numerous theme hooks that you may use to easily add new site content without affecting the parent theme.
Before the Top Bar content located on the left side of the Top Bar.
engage_before_top_bar_right
Before the Top Bar content located on the right side of the Top Bar.
engage_before_main_content
Before the main content area.
engage_before_page_title_area
Before the Page Title area.
engage_after_page_title_area
After the Page Title area.
engage_before_footer_area
Before the entire Footer area.
engage_before_footer_widgets
Before the Footer Widgets area.
engage_before_footer_bottom_bar
Before the Footer Bottom Bar (the one that holds the copyright text).
engage_after_footer_area
After the entire Footer area.
Example usage (in the child theme's functions.php file):
function my_site_new_footer_content() {
    echo 'Hello there! I am in a footer!';
}
add_action( 'engage_after_footer_area', 'my_site_new_footer_content' );
Filters
As for now, only one filter is available that allows you to change the portfolio post type slug (used in the URL). To change the portfolio post slug, please use the following code:
function my_site_portfolio_slug( $portfolio_slug ) {
    return 'works'; // New portfolio slug
}
add_filter( 'engage_portfolio_slug', 'my_site_portfolio_slug' );
After doing so, please reset your Permalinks (go to Settings / Permalinks, change them back to default, save and then change back to pretty permalinks).
24. Generating a Personal Token
What is it about?
With 2.0 version of the theme, we are introducing a "Purchase verification" field. It allows us to verify your ThemeForest purchase (powered by the official Envato API) and offer you premium functionalities, like Automatic Theme Updates.
How to generate a Personal Token?
To generate your own, personal Personal Token, please visit the official Envato API website.
You may be asked to log in using your ThemeForest marketplace credentials. Please type your username, password and click Sign in:
When you're logged in, you will be presented with a Create a Token page that consists of two sections:
1. Token name
This is your personal token name. It can be anything, like "Engage Theme".
2. Permissions needed
A set of checkboxes with various permissions you are granting the app. We need these to verify your purchases and allow update downloads directly from Envato Servers:
View and search Envato Sites (always checked)
Download your purchased items
List purchases you've made
Verify purchases you've made
In the end, just make sure it looks like the following:
When you're done with the above, just check the "I have read, understood and agree to the Terms and Conditions" confirmation box and click the Create Token button:
Copy your Personal Token
After that, you will be presented with a popup window with your personal token key (it's displayed next to a "key" icon):
Please copy your personal token, then confirm the storage by clicking on the checkbox and press the "Woohoo! Got it." button.
Paste your Personal Token in Theme Dashboard
Now, paste your newly generated Token Key in the "Purchase verification" box in the Engage / Dashboard tab in your WordPress and click Submit.
If your Token is correct, you will be presented with this view:
That's it! When a new theme update is out, you will be notified in your Dashboard / Updates menu or in Appearance / Themes tab.